Lesson 4: Additional Profile README Features
Overview
This page will help you know what to include on your github profile readme. All these are ideas. Use this code as needed in your profile. On the left is what the section will look like. On the right is the code used to make the section on the right. Copy the code and put it into your profile, editing it as needed to fit you.
Learning Objectives
- Students will be able to create a Github Profile README customized to their unique skills and abilities.
Lesson
Definition of Github README
Generally, A GitHub README is a document that typically accompanies a GitHub repository, providing essential information about the repository and its contents. It’s named “README” because it’s often the first thing a visitor should read to understand what the project is about. The importance of a GitHub README cannot be overstated, as it serves several critical functions, but we will only talk about 3 in this lesson.
Key Features and Importance of a GitHub README:
Project Introduction: It introduces the project to users, developers, or potential contributors. This is where you provide an overview of what the project does and its purpose.
Documentation: The README often contains documentation on how to install, configure, and use the project. This can include code examples, configuration settings, and command-line instructions.
Technical Details: It may provide technical details such as the technology stack, dependencies, and system requirements.
Definition of Github Profile README
In the context of creating a GitHub profile, a GitHub README serves as a personalized introduction and overview of a user’s GitHub presence. Unlike a repository-specific README that focuses on a particular project, a GitHub profile README provides a broader view of the user, their interests, skills, and contributions.
Key Features and Importance of a Github Profile README:
Personal Introduction: A brief section about who you are, what you do, and your interests. This can include your professional role, educational background, or areas of expertise.
Skills and Technologies: Highlight the programming languages, tools, and technologies you are proficient in. This can be done through text, badges, or icons.
Projects and Work: Showcase your significant or favorite projects. You can include links to repositories, descriptions of what each project entails, and any notable achievements.
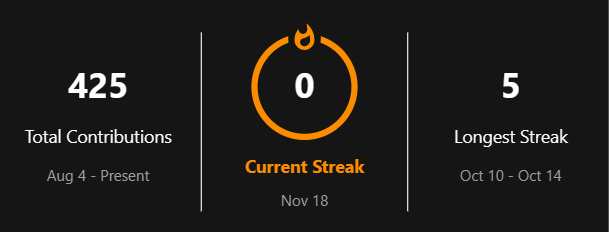
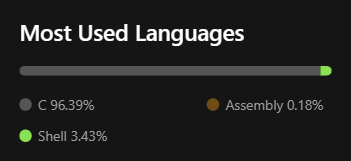
GitHub Statistics: Some users include dynamic GitHub stats like their number of contributions, most used languages, or streaks. This can be done using GitHub widgets and badges.
Tools And Links
There are a list of tools and links which we will make use of in this Lesson to enhance our Github Profile Readme. They are as follows;
Devicons: DevIcons Github Repository This link can be used to integrate logos(images) of any programming language you are conversant with to you Github profile. You shall learn how to do this in the Adding logos in Enhancing Your Github Profile section below.
Shields.io: shields.io This link is used to include social media badges on your profile. This is to provide a gateway for possible recruiters to connect with you on any platform you provide.
Gifs: GIF Link Thus link can be used to include Gifs on your profile README. You may be wondering what gifs have to do with profile images, but when you look at how appealing most gifs are, you tend to see how much aesthetic it provides to your profile. You will learn how to go about this in the next section.
Github’s built in text Editor: Github comes with a built in code editor, and this is basically what we will be using to edit our github profile readme file. You can click on the “Pen” icon on the top right conrner of your profile to edit your profile using Github built in text editor.

Enhancing Your Github Profile README
To create an impactful GitHub profile README, focus on an engaging presentation of your skills and projects. Begin with a brief introduction, including your name, role, and a touch of personalization to make it relatable.
Next, showcase your work by organizing sections with project thumbnails, titles, descriptions, and links to your repositories or deployed applications. Consider incorporating GitHub Readme Stats or widgets to display your GitHub activity, lending credibility to your contributions. List your skills and technologies to give viewers insight into your expertise. Highlight significant achievements and contributions, and provide contact information for networking and collaboration opportunities.
Keep your README updated as you embark on new projects or attain milestones, and encourage engagement from visitors by including a call to action.
Name Section:
This will go best at the top of your profile readme. Paste this code at the top.
Description Section:
Writing a description section is very important. Here is where you can make yourself stand out from others to employers. Below are ideas of what to include. Feel free to include anything that conveys that you are a capable employee in your field.
Provide a brief introduction about yourself, your current academic pursuits, and your career goals. Mention your passion for technology and the specific field you’re interested in (data science, computer science, web development).
Description:
- 🔭 I’m currently working on [Current Project/Job].
- 🌱 I’m currently learning [What you are learning].
- 👯 I’m looking to collaborate on [Open Source Projects or any interesting projects].
- 🤔 I’m looking for help with [Any specific help you need].
- 💬 Ask me about [Anything you’re open to discussions about].
- 📫 How to reach me: [Your Email or other contact information].
- ⚡ Fun fact: [Something interesting about yourself].
**Description**:

- 🔭 I’m currently working on [Current Project/Job].
- 🌱 I’m currently learning [What you are learning].
- 👯 I’m looking to collaborate on [Open Source Projects or any interesting projects].
- 🤔 I’m looking for help with [Any specific help you need].
- 💬 Ask me about [Anything you're open to discussions about].
- 📫 How to reach me: [Your Email or other contact information].
- ⚡ Fun fact: [Something interesting about yourself].
Skills Section
This section is where you can show what you are comfortable using. As a beginner, this section can be empty. For more experienced students, it’s a good idea to include the technology you are familiar with. Areas to include are:
- programming languages: (python, JavaScript, C++…)
- hosting services: (Heroku, GitHub Pages, AWS…)
- frameworks/libraries: (pandas, tensorflow, ggplot2, ReactJS…)
- databases: (MSSQL, Postgres…)
or anything else that would help what technology you are comfotable using like Git/GitHub, Quarto which we will be learning later in this course.
The example below is table showing technology a Data Science student might be familiar with.
Favorite Technology
| Python | R | |
|---|---|---|
| Reading | Pandas | Readr |
| Wrangling | Pandas | Tidyr & Dplyr |
| Visualization | Matplotlib | ggplot2 |
| Model | Scitkit-Learn | TidyModels |
Adding Logos (Software, Lanugages, Companies…)
Now, we will add images representing the technologies and skills you are familiar with. You can always finds free logos for many programming languages and tools in DevIcons Github Repository.
Go to the icons folder and search and open the Pandas folder. In the folder, you’ll find images in SVG(Scaleable Vector Graphics) format. Click on any image and copy the URL shown in the browser’s address bar 
We will make use of this URL in the <img /> tag and specify the height and width attribute accordingly. Similarly, you can search for other skills and include them in a seprate <img /> tags.
Include the code below to your Github README.md. You can Add/Remove any skills of your choice. Ensure any skill you choose to show on your repo, they should be ones you are conversant with.
![]()
![]()
![]()
![]()
![]()
![]()
![]()
![]()
![]()
![]()
![]()
![]()
![]()
![]()
![]()
![]()
![]()
![]()
![]()


  Adding Social Links to Your Github Profile README
On this section, we will be adding social network badges to your github profile readme. On clicking this badges, it redirects users or visitors to their respective social networking sites. Badges of various social networks like Instagram, Facebook, Twitter, Medium (blog site), etc. But for this section, we shall only focus on two: LinkedIn and Twitter.
To get the respective badges for each social networks, we’ll use shields.io which provides various endpoints letting users create and customize social media badges. We’ll use the URL and pass additional parameters to this URL to get the respective social media badges.
Adding GIFS to Your Github Profile README
The Gif used in this section can be found here. I found this GIF on Giphy, which is full of free GIFs to use.
Go to the GIF Link and click on the Share button and then Copy GIF Link. We’ll add this copied link to an HTML img tag to display it in the Markdown file. We’re using the img tag as it’ll help us specify the width of the image.
In the Github file editor, replace the README.md file content with the following code:
- The first parameter we will pass is
Label(This represents the social network site name that will appear on the badge) andColor(which represents the color of the social network badge respectively).Label-Color
In the case of our example being LinkedIn and Twitter, their color will be blue.
When the parameters listed above (Label and color) are combined with https://img.shields.io/badge/, the following URLs are created. For LinkedIn, https://img.shields.io/badge/LinkedIn-blue. For Twitter, https://img.shields.io/badge/Twitter-blue.

Adding Github Profile Summary Stats Widgets
Option 1

Option 2
Option 3
Practice Activity
Using the tools and examples provided, update your GitHub profile README.
Include at least one widget, a skills section, and a personal introduction.
Post your updated README in your team channel to receive feedback from peers.
Conclusion
Great job completing this lesson! By now you should:
Have a robust github profile of your own.
Should be equipped to help others make one as well.
Note
Remember to keep your github profile readme up to date. Treat this page like a resume and portal to your portfolio for employers to find. This is a tool for finding work. Think to yourself, “If I were an employer, what would I need in an employee?”. Whatever the answer to that is, convey it in your README.