flowchart LR
    A(Git Clone/Git Init) --> B{Is there branch?}
    B --> C[Git pull branch-name]
    B --> D[Git pull main]
    C --> E[work on changes]
    D --> E[work on changes]
    E --> F[Git Add changes]
    F --> G[Git commit changes]
    G --> H[git push changes]
Lesson 3: Git and How to connect to VScode
Overview
In this lesson you will learn the basics of git and how to use it in VScode
Learning Objectives:
Students will be able to understand the concepts of Git and its functionality.
Students will learn the benefits of using Git for version control.
Students will be able to identify basic Git workflows, including cloning, committing, pushing, branching, and merging.
Students will gain practical knowledge of setting up and using Git within VScode.
Lesson
Introduction to Git
Git is a powerful and widely used version control system that allows developers to track changes in their code over time. It was created by Linus Torvalds in 2005 to support the development of the Linux kernel. Git is designed to handle projects of all sizes with speed and efficiency.
Why Use Git?
Collaboration: Git makes it easier for multiple people to work on the same project without interfering with each other’s work. It allows for parallel development, where team members can work on different features simultaneously.
History Tracking: Every change made to the files in a project is tracked. This means you can revert back to any version of a file at any point in time. Branching and Merging: Git’s branching capabilities are a standout feature. They allow you to diverge from the main line of development and experiment with new ideas without affecting the main project, then merge those changes back in when they’re ready.
Distributed Development: Git is a distributed version control system, meaning every developer’s working copy of the code is also a repository that can contain the full history of all changes. Basic Concepts
Working with Git
Git’s functionality is accessible primarily through the command line. Common commands include;
git clone,
git pull,
git push,
git branch,
git commit,
and git merge.
Git works well with various platforms like GitHub, GitLab, and Bitbucket, which provide remote repositories and additional collaboration features.
Git usuage flow chart
How to Install Git
Installing Git is a crucial step for anyone getting started with version control. Here’s a beginner friendly guide to installing Git on different operating systems.
1. For Windows Users
Download the Git Installer:
- Visit the Git website and download the latest version of Git for Windows.
- The download should automatically start based on your Windows version.
Run the Installer:
Open the downloaded file to start the installation. You will be greeted with the Git Setup wizard.
Installation Options: Follow the setup instructions. You can leave most options at their default settings. When prompted to choose the default editor, you may select the one you’re most comfortable with (e.g., VSCode, Notepad++, etc.).
Adjusting Your PATH Environment: During the installation, you’ll be asked to adjust your PATH environment. Select “Use Git from the Windows Command Prompt” for ease of use.
Configuring the Line Ending Conversions:
Choose how you want Git to treat line endings in text files. The recommended setting for Windows users is “Checkout Windows-style, commit Unix-style line endings”.
Completing the Installation: Proceed with the installation. Once completed, click ‘Finish’.
Verify Installation:
Open Command Prompt and type
to ensure Git is installed correctly and to see the installed version.
2. For MacOS Users
Install Git via Homebrew: If you have Homebrew (a package manager for macOS), you can install Git by opening the Terminal and typing
Install Git from the Official Website:
Alternatively, you can download the macOS Git installer from Git’s official site. Open the downloaded file and follow the installation instructions.
Verify Installation: In the Terminal, type
to check the installation.
Git configuration:
After installing Git, it’s a good practice for users to set their Git username and email address, which will be used for every Git commit. This can be done by executing the following commands in the terminal or command prompt:
This steps ensures that all your commits will have your identity attached to them anytime you commit and push to a repo.
Basic Concepts of Git
Repository(Local and Remote): A repository (or ‘repo’) is like a project’s folder. It contains all of the project files and the history of changes made to those files.
Commit: A commit is like a snapshot of your repository at a specific point in time. Commits include a message describing what changes were made.
Branch: A branch in Git is a lightweight, movable pointer to one of these commits. The default branch is named ‘master’.
Merge: Merging is the process of integrating changes from one branch into another. Working with Git.
Pull Request: Is a feature in Git that allows developers working on a project collaboratively to propose changes to a codebase. It is a way to initiate a discussion and review process
1. Repository (Local and Remote)
Local Repository
Definition: A local repository in Git is a directory on your computer where Git stores all the files and the history of changes made to those files.
Function: It allows you to work on your project and make commits, branches, and other Git operations offline.
Creation and Usage:
Created using git init or git clone commands.
Local repositories are where you’ll do most of your work, including editing, staging, and committing changes.
Note: When you initialize or clone a repository on your local machine, you will often see a .Git directory as shown below:
Clone a Repository To get a repository from GitHub onto your computer, the repository on GitHub needs to be “cloned” on to your computer. Open a new window in VSCode, source control will look like this.
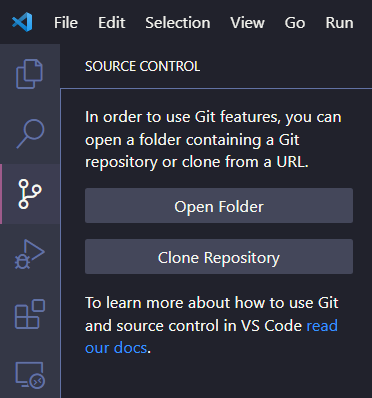
Steps: - open new window for VSCode - copy the github url for the desired repository - click “Clone Repository” and paste in there
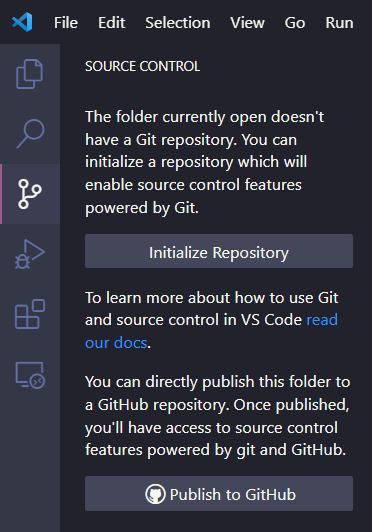
Initialize a Repository To put an existing project of yours onto GitHub, you’ll need to “initialize a repository”. Open VSCode in that existing project’s folder, source code will look like this.
Steps:
- click “Initialize Repository”
Remote Repository
Definition: A remote repository is a version of your project hosted on the internet or a network.
Purpose: It facilitates collaboration, allowing multiple people to push to and pull from the same project.
Common Platforms: Platforms like GitHub, GitLab, and Bitbucket host remote repositories.
Interaction: - You can push your local changes to a remote repository using
- You can also fetch and merge changes from a remote repository to your local one using
2. Commit/Push
Definition: A commit in Git is a snapshot of your project’s current state, allowing you to capture the condition of your project at a specific point in time.
Importance: Commits serve as checkpoints where individual changes can be made permanent to the repository’s history.
Usage: To save your staged changes along with a descriptive message, use the code below:

!!! info “Git commit messages best practices” - Commit messages should be clear and concise - commit messages should reflect the changes made. i.e “updated file upload function in task.py”
Purpose: Git push is used whenever we want to push your current commit from your local repository to the remote repository. What this code does under the hood is to push the current state of our codes to the remote repository.
Syntax
Replace [branch-name] with the name of the branch in which you wish to push the changes to. By default, origin is the name git gives to the remote repository once initialized or cloned. And the default branch name in origin is main
To get your changes from your computer to GitHub, you’ll need to commit and push your changes.
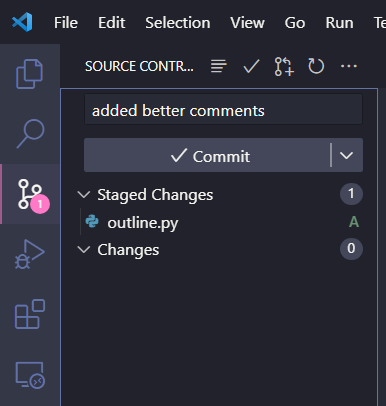
To commit and push your most recent changes to your files:
- save your file
- type out a message that reflects your how this version of your code is different from the previous version
- click “Commit”
- click “Sync Changes”
3. Branch
Definition: A branch in Git represents an independent line of development in a project.
Purpose: Branches allow you to work on different features or fixes without affecting the main codebase.
Usage:
- Create a new branch with git branch [branch-name].
- Switch between branches using git checkout [branch-name].
- To view all branches available in the Remote Repository
- To delete a branch on the remote repository
Use descriptive names for branches. Create separate branches for different features or bug fixes.
Clear branch names help with organization, understanding the purpose of the branch, and managing multiple branches.
Common Naming Strategies - Feature Branches: Name feature branches with a prefix feature/, followed by a short desccriptor (e.g., feature/add-login).
Bugfix Branches: For bug fiexes, use a prefix like bugfix/ or fix/ (e.g bugfix/login-error)
Release Branches: Release branches can be prefixed with a release/, followed by the version number (e.g., release/1.2.0).
Hotfix Branches: Urgent fixes can use hotfix/ as a prefix, followed by the issue being fiexed (e.g., hotfix/memory-leak).
Personal/Branches for Experimentation: Include your name or initials for personal or experimental branches (e.g., jd/test-new-feature).
Keep Branches Focused: Each branch should represent a single feature or fix. This makes it easier to review and merge.
Regularly Update from Main Branch: Frequently merge or rebase your branch with the main branch (like master or main) to stay up-to-date with the latest changes and avoid large merge conflicts.
Prune Regularly: Delete branches once they are merged and no longer needed to keep the repository clean.
To add your changes to a repository without making it the main version of the code, you can create a “branch”.
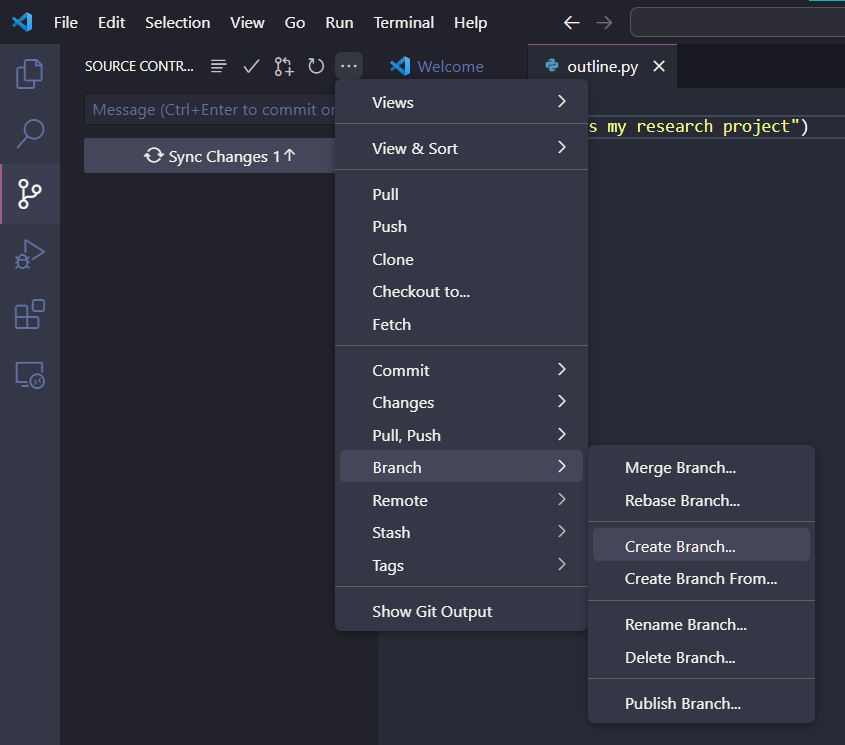
Steps:
- Save work, stage file(s), write commit message, and click commit
- Click on the three dots at the top right of the source control pane
- Click “Branch”
- Click “Create Branch”
4. Merge
Definition: Merging in Git is the act of integrating changes from one branch into another.
Application: Commonly used to combine the development work of different branches. After testing and approving changes in a feature branch, you merge them into the main branch (often called main).
Process: Use
to merge the changes from [branch-name] into your current branch.
Conflict Resolution: If there are conflicts between the branches, Git will prompt you to resolve them before completing the merge.
To make your branch part of the main version of the code, you’ll have to “merge” your branch.
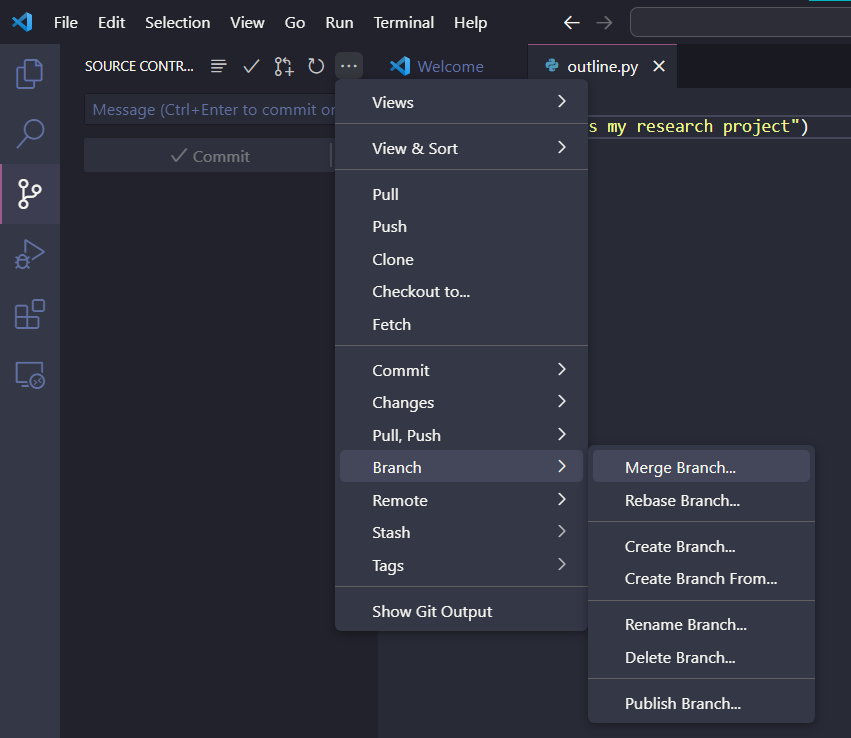
Steps:
- Save, stage, commit, pull, and push to your work to your branch
- Click on the three dots at the top right of the source control pane
- Click “Branch”
- Click “Merge Branch”
5. Pull Request
Definition: A pull request (PR) is a method of submitting contributions to a project. It’s specific to platforms like GitHub, GitLab, or Bitbucket.
Purpose: PRs are a way to inform team members that changes in a branch are ready to be merged into the main branch. They provide a platform for code review and discussion about the changes.
Process: Once you push your branch to a remote repository, you can create a pull request through the repository’s web interface. Other team members can review the changes, provide feedback, and once approved, the changes can be merged into the main branch.
Git with VSCode:
Connecting Git to Visual Studio Code (VSCode)
Integrating Git with VSCode streamlines the development workflow, allowing you to perform version control tasks directly from the editor.
Open VSCode: Launch Visual Studio Code.
Accessing Git:
In VSCode, Git can be accessed by two methods:
Via the Source Control: Locate the source control icon on the left sidebar (it looks like a branching tree). Clicking on this icon will open the Source Control panel. If Git is installed and configured correctly, VSCode will automatically detect and integrate Git functionalities.
Via the command line using Git commands. Which is what we focused on in this lesson.
Practice Activity
1. Git Simulation Game:
Tutors should provide students with a Markdown file. Students will add a paragraph to the file, tracking the changes made.
Task: Each pair will perform the following actions using Git commands in a terminal or with Source Control:
Initialize a local repository in a new folder with the file in it.
Create a new branch to work on a specific feature.
Make changes on the feature branch and commit them.
Write clear commit messages describing the changes.
Switch back to the main branch and merge the feature branch.
Send a screenshot of the merge output from the terminal or Source control and the modified file to your group channel.
Reach out to group members or mentor if any merge conflicts arise.
Bonus: For advanced learners, you can experiment with concepts like pull requests and remote repositories. Students can simulate pushing their changes to a remote repository and creating pull requests for review and merging.
Conclusion
With the basics of Git under your belt and VScode’s integrated power at your fingertips, you’re well on your way to mastering version control and boosting your development workflow. Good Job. By now you should:
Understand the basic concepts of Git - Repository, Commit, Push etc.
Know how to use Git in Visual Studio Code
Know how to upload to and work with cloud repositories online like Github, Gitlab etc.
Remember, the more you practice, the smoother your project journeys will become. Keep exploring, keep learning, and keep pushing your code horizons!
This concise yet impactful conclusion retains the key takeaways while encouraging continued learning and development.