CSS Selectors Table
Overview
Say we have a basic paragraph, like the one below. The boring gray text isn’t very exciting. With CSS, there is a better way.
Lorem ipsum dolor sit amet, consectetur adipiscing elit, sed do eiusmod tempor incididunt ut labore et dolore magna aliqua. Porta lorem mollis aliquam ut. Quam id leo in vitae turpis massa sed elementum tempus. Ullamcorper malesuada proin libero nunc. Morbi blandit cursus risus at ultrices mi. Ultrices gravida dictum fusce ut placerat. Vitae tortor condimentum lacinia quis…
Instead of this gray text, let’s theme our appearance to more of a “dracula” color theme. Compare the paragraph below to the paragraph above.
This is a Dracula-themed paragraph with colored text, a darker background, and a purple border. You can add some green, some yellow, and even some pink accents for a better theme!
Learning Objectives
- Students will understand the use of CSS
- Students will learn how to use CSS for basic styling such as font sizes, font color, background colors, and more
- Students will understand the cascading element of CSS
Lesson
Before we get into CSS, let’s take a step back. What is it used for? When is it used? How is it used? In web development there are three major languages: HTML, CSS, and JavaScript. Let’s briefly discuss these.
HTML (HyperText Markup Language):
In unit one of the course, you learned about Markdown. HTML is similar. They effectively do the same thing. Their difference is markdown is easier to write but less capable than HTML. HTML is more difficult to write but is far more capable.
Think of HTML as the skeleton of a website. Imagine your body without any skin, just bones. HTML gives structure to web pages, like how bones give shape to your body. It tells the web browser what each part of the webpage is, like headings, paragraphs, images, and links. These parts are wrapped in tags, like labels, so the browser knows how to show them.
CSS (Cascading Style Sheets):
Now, think of CSS as the clothes and colors you put on the skeleton to make it look cool! CSS adds style and design to the webpage. It decides how things look, like the colors, fonts, spacing, and layout. It’s like magic paint that changes how the webpage appears, making it look pretty and interesting.
So, HTML sets up the structure, and CSS makes it look awesome! They work together to create websites that are both organized and cool-looking, just like putting together a fun puzzle!
JavaScript
JavaScript is like the brain of a website. Imagine your body with a brain that makes decisions and does things. JavaScript adds life, interactivity, and intelligence to web pages. It’s like the brain that makes things happen and responds to what you do, making websites more engaging and fun to use.
Short recap: - HTML: Provides the structure and content of a webpage. - CSS: Enhances the appearance and styling of HTML elements. - JavaScript: Adds interactivity and dynamic behavior to web pages.
CSS Cascades
CSS stands for “Cascading Styling Sheets”, what does this mean? It’s built on the idea that you can have a blank statement that all font should be size 12 across a website. This will be true for the entire website, until a more specific rule is applied. While that rule is still in effect, another rule can be applied for a section of the website, like the customer support section, that all the background colors should be light yellow. This means that this section of the website will have size 12 font and a light yellow background.
Now, say we’re editing a specific line in this section with 12 point font and a yellow background. If we apply a more specific rule that the font should be size 16 in this specific area, this most specific rule overrides the existing rules for this area.
How to Use CSS in Quarto
There are three standard ways to write CSS: inline, embedded in head tag, and external. We will only cover inline and external.
Inline
Imagine you’re drawing a picture, and you want to color one part of it differently from the rest. You could take a colored marker and draw over that part directly, right? That’s similar to how inline CSS works.
With inline CSS, you add styling directly to individual HTML elements using the “style” attribute. Here’s an example:
In this example, the style attribute is added to the
tag, and it contains CSS rules (like color: blue; and font-size: 18px;) that specify how the text inside the paragraph should look. This way, you’re directly applying styling to that specific paragraph.
External
Now, let’s say you’re drawing a big picture with lots of different parts, and you want them all to have the same style. Instead of coloring each part individually, you could prepare a set of colored markers and use them whenever needed. That’s similar to how external CSS works.
With external CSS, you create a separate CSS file that contains all your styling rules. Here’s an example:
In this CSS file, we’ve defined styling rules for
elements to make their text blue and bigger. Now, to apply these styles to our quarto document, we link the CSS file using under html in the yaml header as shown below
CSS Selectors
What is a CSS Selector? Now, let’s imagine you are building a website like a big playground! Each element on the page, like pictures, buttons, or text, is like a building block. CSS Selectors are like special tools that let you point and say, “Hey, you in a blue shirt and red hat, I want you to do THIS!”.
Using this scenario, it is safe to say that css selectors help us identify and interact with html tags. The knowledge of the tags, will enable us use css selectors and apply a set of rules and styling to the HTML element tag.
There are many different types of CSS selector that allow you to target rules to specific elements in an HTML document as shown in the table below.
| Selector | Meaning | Example |
|---|---|---|
|
Applies to all elements in the document |
* {}Targets all elements on the page |
|
Matches element names |
h1, h2, h3 {}Targets the <h1>, <h2>, and <h3> elements |
|
Matches an element whose class attribute has a value that matches the one specified after the period (or full stop) symbol |
.note {}Targets any element whose class attribute has a value of note |
|
Matches an element whose id attribute has a value that matches the one specified after the pound or hash symbol |
#introduction {}Targets the element whose id attribute has a value of introduction |
|
Matches an element that is a direct child of another |
li>a {}Targets any <a> elements that are children of an <li> element |
|
Matches an element that is a descendent of another specified element (not just a direct child of that element) |
p a {}Targets any <a> elements that sit inside a <p> element, even if there are other elements nested between them |
|
Matches an element that is the next sibling of another |
h1+p {}Targets the first <p> element after any <h1> element |
|
Matches an element that is a sibling of another, although it does not have to be the directly preceding element |
h1~p {}If you had two <p> elements that are siblings of an <h1> element, this rule would apply to both |
CSS Properties and Values
Text styling is one of the fundamental aspects of web design. It not only improves readability but also enhances the overall aesthestics of a webpage.
In brief, a CSS property affects how elements are displayed in a webpage.
CSS declarations sit inside curly brackets and each is made up of two parts: a property and a value, separated by a colon. You can specify several properties in one declaration, each separated by a semi-colon. As shown in the image below;
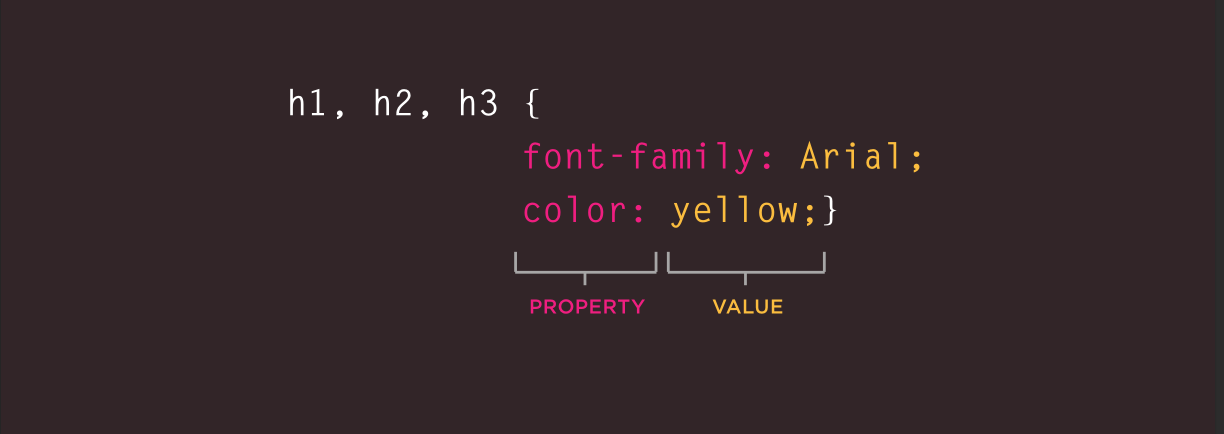
This rule indicates that all <h1>, <h2> and <h3> elements should be shown in the Arial typeface, in a yellow color.
Properties indicate the aspects of the element you want to change. For example, color, font, width, height and border.
Values specify the settings you want to use for the chosen properties. For example, if you want to specify a color property then the value is the color you want the text in these elements to be.
In this lesson, we will explore various CSS properties that can be used to style text and fonts. Some of those properties are as follows;
- Color: The color property specifies the color of the text inside an element. It can accept various formats, including keywords like
- red,
- HEX (#ff0000),
- RGB (rgb(255, 0, 0)), etc…
Example:
- Font-Family: This property specifies the font for the text. It can be a specific font (e.g., Arial), a generic family (e.g., sans-serif), or a list of fonts, known as a “font stack,” where the browser will use the first available font.
Example:
uses “Times New ROman” if available, otherwise falls back to any available serif font.
- Font-Size: font-size determines the size of the font. Font-size can be specified in different units, such as;
- Pixels (px),
- Oiubts (pt),
- ems (em),
- Percentages (%)
Example:
- Font-Weight: Controls the thickness of the text. Some font-weight include;
- normal
- bold
- bolder
- lighter
- or numerical values ranging from 100-900.
Example:
- Text-Align: This Css property aligns text horizontally within it’s containing element. Possible values are
- left,
- right,
- center,
- justify
Example:
- Text-Decoration: Adds decorative elements to text, such as;
- underlines,
- overlines,
- line-throughs,
- or a combination of the ones listed above
Example:
- Text-Transform: Text Transform controls the capitalization of text. The values includes the following;
- none,
- capitalize (first letter of each word is capitalized),
- uppercase (all letters are uppercase),
- lowercase (all letters are lowercase). etc.
- Line-Height: Sets the height of a line of text, affecting the space between the lines in a paragraph. Line height
- Can be a number (without units, which acts as a multiplier to the font size)
- length (px, em, etc.),
- or precentage.
Example:
The purpose of line-height is to enhance readability.
- Letter-Spacing and Word-Spacing: These properties control the space between letters and words, respectively. They can accept values like normal or lengths (e.g., 2px).
Example:
Text
Text styling and formatting plays an important role on the appearances and structure of texts in a website. We’ll explore how to control the appearance of your text, adding personality and impact to your web pages. Buckle up, and let’s dive into the world of font properties!
1. Coloring Your Words: The Magic of color
Imagine writing with a rainbow of colors instead of a plain black ink! The color property lets you do just that! You can apply an color imaginable using either it color-name(red, blue) or HEX values(#FF0000) just as we discussed in the CSS Properties and Values section.
The Example below will change the text color to Red;
Outcome:This text is a red color!
Bonus Tips: You can use this link color_wheel to choose colors for your web page styling.
2. Sizing Up: The font-size Property
DO you want your text to whisper softly or shout out from the rooftops? The font-size property controls the size of your font. Fonts sizes are measured in various units like pixels, point, or even relative sizes like larger(em) or smaller(rem). This was discussed in the CSS properties and values section above.
Image of Units Of Type Size 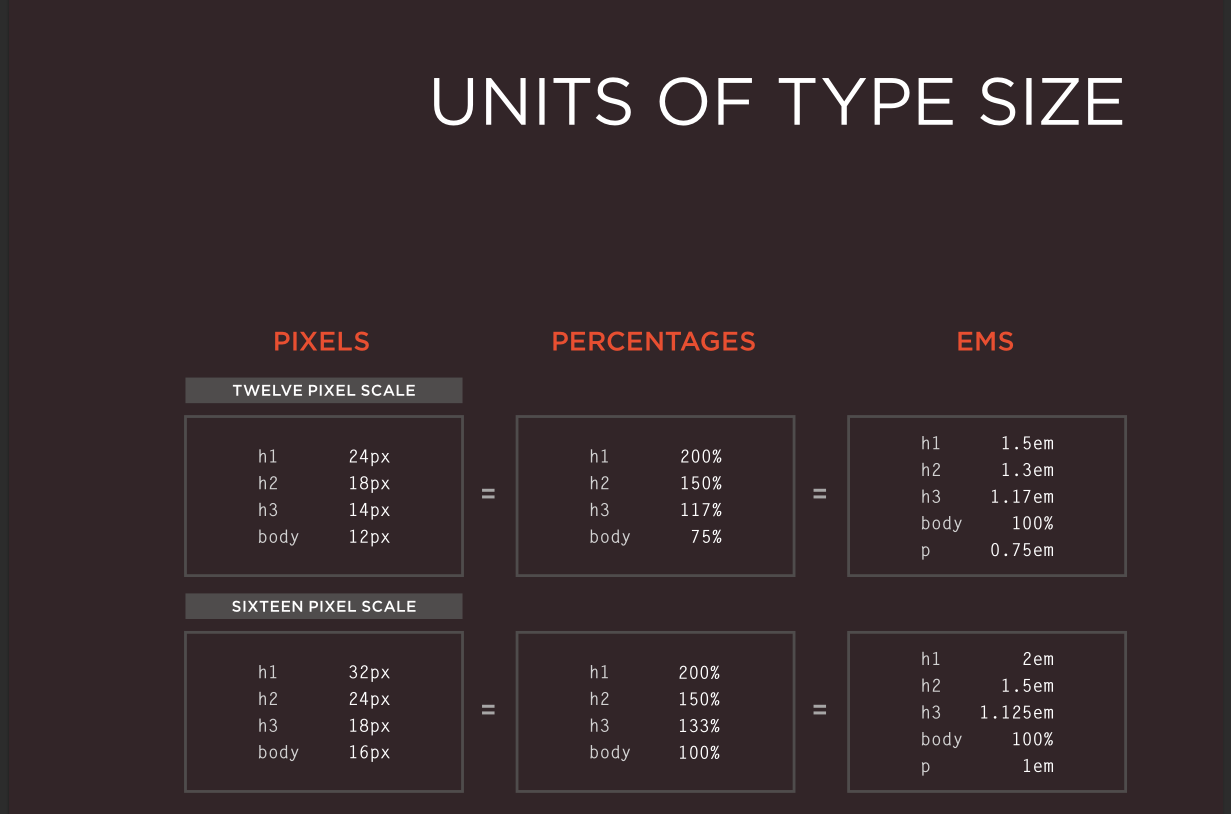
Example:
  <h1>This heading is big and bold!</h1>
<p style="font-size: 1.5em;">This paragraph is slightly larger than the default size.</p>This heading is big and bold!
This paragraph is slightly larger than the default size.
3. Font Family: The Power of font-family
The world has more than just Times New Roman! Use the font-family prperty to choose from a wide variety of fonts installed on the user’s system. Remember, you have to specify multiple options as a fallback in case the user’s systems doesn’t have your first choice.
Example:
  <p style="font-family: 'Courier New', monospace;">This text uses a typewriter-like font style.</p>
<p style="font-family: 'Playfair Display', serif;">This one uses a fancy serif font.</p>
Image of Typeface Terminology 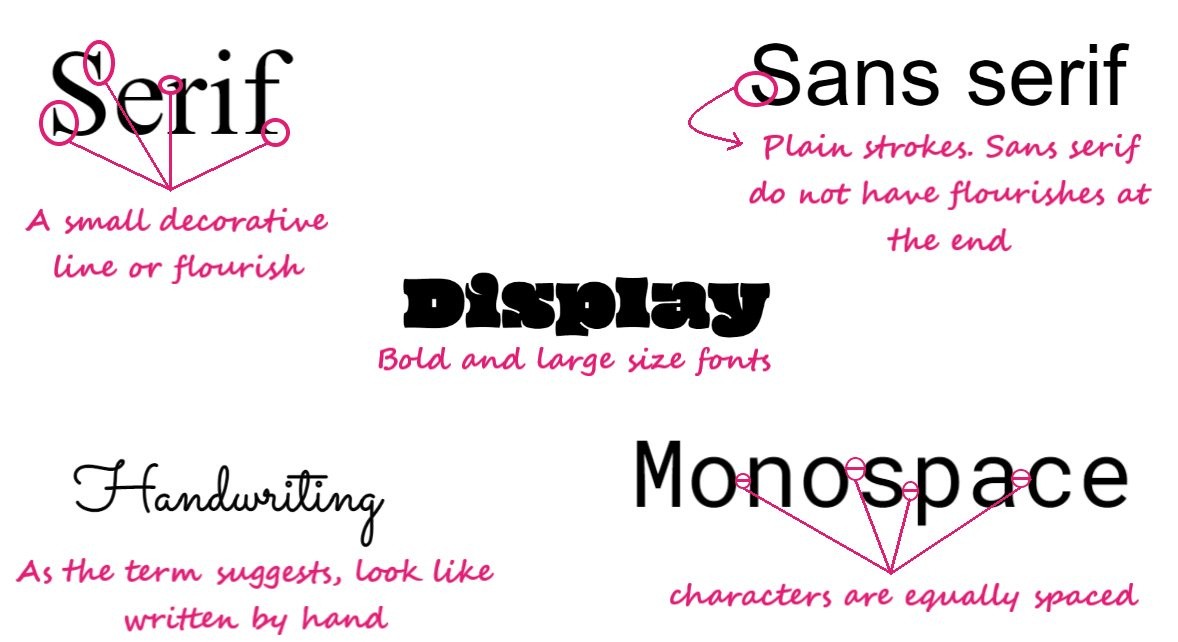
This text uses a typewriter-like font style.
This one uses a fancy serif font.
4. Fine-Tuning Your Font: font-style, font-weight, and font-variant
Do you want your text to be italic, bold, or even underlined? Explore the possibilities with these properties:
font-style: Choose between normal, italic, or oblique styles.font-weight: Make your text light, bold, or even heavier with iptions like 400, 700 etc.font-variant: Apply decorative effects like small-caps or superscript/subscript.
Example:
  <p style="font-style: italic;">This text is italicized.</p>
  <p style="font-weight: bold;">This one is bold and strong!</p>
<p style="font-variant: small-caps;">This text uses small caps.</p>This text is italicized.
This one is bold and strong!
This text uses small caps.
Styling Background
In this section we will explore how to add colors, images and control their positioning to create visually stunning and engaging layout.
1. Painting the Backgorund: The Magic of background-color Imagine giving your web page a whole new look with just one brushstroke! The backgorund-color property let’s you set a solid color for the entire background. Choose any color using it’s name(e.g blue) or it’s hexadecimal code (e.g., #0000FF for blue).
Example:
2. Bringing Pictures to Life: The Power of background-image
With the background-image property, you can showcase a beautiful image as your background. Enter the background-image property! Specify the image path, and your chosen image will grace your web page.
Example:
  <div class="hero-section" style="background-image: url('images/hero-banner.jpg');">
  <h1>Welcome to Our Website!</h1>
  </div>
3. Positioning and Repeating Images: background-position and background-repeat
Don’t let your background image sit awkwardly! Use these properties to fine-tune its placement and behavior:
background-position: Control the X and Y coordinates of the image or use keywords like center, top, etc.
background-repeat: Decide whether the image repeats itself (e.g., repeat) or covers the area once (no-repeat).
Bonus Tip: Explore online resources like Google Fonts and Font Awesome for more font options and inspiration!
4. Defining Boundaries and Dimension: Borders and Box Shadows
Welcome to the realm of visual definition! In this section, we will explore how to add borders and box shadows to your web elements, enchancing their visual hierarchy and creating a sense of depth and dimension.
- Drawing Lines: The Power of
border
Imagine building walls around your elements to seperate and define them. The border property let’s you do just that, creating a single line border around an html element. You can customize it’s width, style, and color to achieve the desired visual effect. Example:
  h2 {
    border: 5px solid #ccc; /* 3px wide solid border in light gray */
}
.button {
    border: 5px dashed #333; /* 2px dashed border in dark gray */
}
Outcome:

5. Beyond Lines: Fine-Tuning with border-width, border-style, and border-color
Want to control the thickness, pattern, and color of your borders individually? Enter these properties:
border-width: Set the thickness in pixels (px) or other units.border-style: Choose from styles likesolid,dashed,dotted, etc.border-color: Apply any color using names or hex values.
Example:
  p.one {
  border-top: 5px solid #FF0000; /* Thick red border on top only */
}
  p.two {
    border: 5px solid #ddd; /* Thin gray border all around */
    border-right-color: #000; /* Change right border color */
}
Outcome:

6. Adding Depth: The Magic of box-shadow
Want to elevate your elements and create a sense of dimension? The box-shadow property allows you to add shadows around elements, mimicking real-life light and depth perception.
Example:
.card {
  box-shadow: 0px 2px 5px rgba(0, 0, 0, 0.3); /* Subtle shadow below the card */
}
.button:hover {
  box-shadow: 0px 3px 8px rgba(0, 0, 0, 0.5); /* Grow shadow on hover */
}
Outcome: 
Practice Activity
Stylish Web Page Creation
Objective: Create a stylish web page that incorporates various CSS styling techniques covered in the lesson. This activity will test your understanding of CSS properties, selectors, text styling, background styling, and border & shadow effects.
Requirements:
Page Structure and Content:
Create an HTML file with basic content including a heading <h1>, a few paragraphs <p>, and a list <ul> or <ol>. Include a section that introduces a fictional character, product, or service. This section should have a title, a description, and at least one image.
Styling with CSS:
Text Styling: Use various CSS properties to style the text in your HTML document. Experiment with different font-family, font-size, color, text-align, text-decoration, and font-weight values to achieve an aesthetically pleasing look.
Background Styling: Apply a background-color to the body of the document and use a background-image for at least one section. Ensure the text remains readable over the background.
Border and Shadow: Add borders to some elements like the image or the section containing it. Use border-radius to create rounded corners. Apply a box-shadow to elevate a specific element, such as a call-to-action button or the image.
Conclusion
Throughout this lesson, we’ve taken a deep dive into the world of CSS, learning how to manipulate the appearance and style of web pages. We started with the fundamental concepts of selectors, properties, and values, and then explored various properties for styling text, backgrounds, borders, and shadows.
By now, you should be able to confidently:
Identify and target elements on a webpage using different CSS selectors.
Apply various CSS properties to customize the appearance of those elements.
Understand the cascading nature of CSS and how styles are applied.
Create basic visual themes and layouts using your newfound CSS skills.
Remember, CSS is a vast and powerful tool, and this lesson has just scratched the surface. As you continue your exploration, you’ll discover even more possibilities to bring your web pages to life and express your unique design vision. Here are some additional resources to fuel your journey:
Interactive CSS Tutorials: Websites like Codecademy and Khan Academy offer interactive tutorials that allow you to learn CSS by doing.
CSS Cheat Sheet: Keep a quick reference sheet summarizing common CSS properties and values handy for easy lookup.
Online Design Tools: Experiment with online design tools like Figma or Adobe XD to visualize your styles before coding them. Don’t be afraid to experiment, explore, and unleash your creativity! The world of CSS awaits your unique touch.
FAQ
Image References
- HTML & CSS Design and Build Websites by Jon Duckett